Saturday, February 27, 2021

Kakitamajiru - かきたま汁 - Egg Flower Soup

After a year of making miso soup several times a week, I went in search of a new soup to make and I didn’t have to look far. This is a very popular soup in Japan. It differs from the Chinese version in that the broth is dashi rather than chicken stock, and is thickened with potato starch. Other than the dashi, egg, and flavourings, you can substitute other ingredients such as green onion, mushroom, carrot, etc.

One possible adjustment you may want to make is a hybrid stock of 1/2 awase (mixed) dashi and 1/2 vegetable dashi. Since most dashi is made with seafood ingredients like kelp, anchovies, bonito flakes, etc. it has a strong ocean smell. My husband calls it “essence of low tide.” I love it, but some may find it too prominent without the very strong flavour of miso.

Kakitamajiru

  • 2 cups dashi
  • 1 tablespoon usokuchi or standard soy sauce
  • 1 tablespoon mirin
  • 1 tablespoon sake
  • 1 1/2 teaspoon potato starch
  • 1 egg
  • 1/2 teaspoon dried hijiki seaweed
  • 1/4 cup baboo shoot strips

Place the seaweed in a small bowl with water to rehydrate.

Make a slurry of the potato starch with some water

Bring the dashi to a rolling boil and add the soy sauce, mirin, and sake.

Add the potato starch and cook until the broth becomes clear again and is slightly thickened.

Reduce heat and allow the soup to cool to a scant boil.

Beat the egg in a measuring cup. Place a cooking chopstick on top of the cup resting in the pouring spout. Very slowly drizzle the beaten egg down the chopstick to make the egg flowers. If you run out of room, you can scoot the already cooked egg out of the way with the other cooking chopstick so that most of the time, your egg is going into the dashi rather than already cooked egg.

Remove from heat and cover to let all the egg cook thoroughly.

Add seaweed and bamboo shoots and stir.

Itadakimasu! 頂きます

Thursday, February 18, 2021

Niku Soba - 肉そば - Beef Noodle Soup

I made myself some Sukiyaki for dinner last night, so had some of the exquisitely thinly sliced marbled beef left over and was casting about for something to do with it while it was still at its prime. In casting, my eye landed on a container of chashu marinade; the byproduct of making chashu pork during my last ramen week. These things, combined with an abundance of vegetables needing used up inspired me to give this dish a try.

If you’re not a ramen-making person, you can make yourself a small batch of something very much like chashu marinade by combining 1/2 cup soy sauce, 1/2 cup sake, and 1/4 cup sugar. It won’t have the pork belly goodness, but is a fair substitute.

As many Japanese recipes do, this one calls for dashi soup stock. You can buy powders, bags to soak in hot water like a tea bag, or surrender to the siren song of washoku and make your own. Nami will help you.

Niku Soba - 肉そば

  • 2 cups dashi
  • 1 cup chashu or ramen egg marinade
  • 1 teaspoon chili bean paste (toban djang)
  • ~ 10 broccoli florets
  • 1 small carrot
  • 1 green onion
  • 2 leaves green cabbage
  • ~ 10 shimeji mushrooms
  • 1/4 pound sukiyaki beef
  • 1 teaspoon miso
  • Soba noodles
  • Bean sprouts
Wash and prepare vegetables. Carrots should be peeled and sliced on the diagonal.

Combine dashi, marinade, and chili bean paste in a donabe or similar sized pot. Heat until the mixture is near boiling. Place broccoli and carrot in the broth and cover. Reduce heat to medium low and simmer for 2 minutes.

Prepare soba noodles according to package instructions.

Add remaining ingredients except for the bean sprouts and simmer for a further 2 minutes.

Using a spoon-sized sieve and chopsticks or spoon, dissolve the miso into the broth. Be sure the broth is well below the boiling point so you don’t kill the live cultures in the miso.

Place noodles in a ramen bowl and ladle soup over it.

Garnish with bean sprouts.

Itadakimasu! - いただきます

Tuesday, January 5, 2021

Hanjuku Tamago Gohan - 半熟卵ご飯 - Soft Boiled Egg and Rice

As I have spent the last nine months working on my Japanese traditional cooking skills and repertoire, I’ve developed some favourite recipes, and also made some of my own customizations to suit my tastes. This one has become my standard weekday breakfast because it is so quick, easy, and satisfying at the start of a day of work.

Tamago Gohan is a classic Japanese breakfast dish that is simply an egg cracked over steaming hot rice. The heat from the rice cooks the egg as you stir it up. It’s also common to add a splash of soy sauce and sesame seeds or furikake.

In my variation, I soft boil the egg, leaving the yolk liquid, and top it off with a seasoning sauce of my own invention made with soy sauce and miso.

Seumas’ Hanjuku Tamago Gohan


squeeze bottle of dark brown sauce
Seasoning sauce

  • 1/2 cup soy sauce
  • 1/4 cup white miso paste
  • 1/4 cup hot chili oil (adjust to your spice preference)
  • 1 dash of sesame oil
Combine the ingredients and blend well. I use an immersion blender to get a thorough result. The miso will settle, and the oil will rise but if you start with a well blended mixture, then a quick shake or stir will get it back in shape to use. The amount above lasts me a week or so.

I keep my seasoning sauce in a squeeze bottle for easy access in the morning.

For the bowl

  • 1 large egg
  • 1/3 cup uncooked short grain white rice
  • Sprinkle of furikake (I prefer seaweed and sesame)
Thoroughly rinse the rice and combine with 5 ounces of water. I use a Japanese rice cooker that I can set up the night before to have my rice ready when I get up, but stove top will work fine as long as you are careful.

Bowl with soft boiled egg
I use my Instant Pot to soft boil my egg in 4 minutes at low pressure with quick release.

Remove the egg immediately and hold under cold running water to cool the shell so you can peel it comfortably. After peeling, just place it in your bowl and bury it in rice.

Sprinkle furikake, and add seasoning sauce.

I like to stab the egg through the rice with my chopsticks to release the delicious egg yolk and let it slowly combine with the rice, but you do you!


Bowl of rice with soft boiled egg

bowl of seasoned rice and egg with chopsticks and pot of tea


Monday, December 14, 2020

Stuff It Squash

There are many recipes out there for making a stuffed acorn squash, but as I surveyed them they all had some fatal flaw. Either they were too fussy about the squash, the stuffing lacked sophistication, or in one awful case, the squash and stuffing were prepared separately! That's false advertising!

I decided to invent my own recipe, and luckily the farm I subscribe to had a bumper crop of acorn squash this year, so I had ample opportunities to refine it.

Serves 2

Stuff It Squash

  • 1 acorn squash
  • 1/2 cup white rice
  • 5/8 cup (5 ounces) beef stock
  • 1/2 teaspoon salt
  • Fresh ground pepper to taste
  • 1 celery stalk
  • 1 medium carrot
  • 1/2 honeycrisp apple
  • 4 slices of bacon
  • 1 shallot
  • Vegetable or olive oil
Start by cooking the rice in the beef stock. Always start by rinsing the rice until the water runs fairly clean. I use a sieve and the sprayer setting on my kitchen faucet. For cooking, I use my Japanese rice cooker, so just toss it in and hit one button. Use whatever method of rice cooking works for you. The proportions are 1 part rice to 1.25 part cooking liquid.

Don't skip rinsing the rice.

Cook your bacon strips using your preferred method. I use the air fry setting on my range at 425 for 13 minutes. Chop finely and set aside.

Chop your vegetables and apple finely and set aside.

In a sauté pan, add about a tablespoon of oil and add your shallot. Cook until it begins to brown.

Preheat your oven to 425F.

When you rice is done, combine it with your sautéed shallot, bacon, vegetables, apple, salt, and pepper and mix.

Fill the squash with the stuffing mixture. Pack the cavity firmly and mound the dressing a little above the edge of the squash.

Cover tightly with tinfoil and bake for approximately 1 hour. Squash are done when a fork easily sinks into the flesh.

Remove from the oven and let rest covered with the tinfoil for about 15 minutes.

broccoli, celery, carrot, mushrooms, shallot, and rice on a cutting board

Finely chopped vegetable ingredients on cutting board

squash stuffed with stuffing on a cutting board
I added the last of the butter before cooking this time. I should have waited.

Squash covered with tinfoil on a roasting rack

Cooked stuffed squash on a roasting rack


Cranberry Apple Sauce

There is one thing and I and my husband will never see eye to eye on; cranberries. I absolutely love things that are tart, and he is more of a sweet guy. When we have had holiday meals together, I always have the cranberry sauce on the side for myself while he eschews it.

Since we have to have our Winter Solstice Banquet online this year due to the pandemic, I will be using this cranberry apple sauce as a glaze on a pork tenderloin roast. It is also great on turkey sandwiches, and as a topping for vanilla iced cream.

Cranberry Apple Sauce

  • 2 Honeycrisp apples
  • 12 ounces fresh cranberries
  • 1 tablespoon fresh orange juice
  • 1 teaspoon fresh lemon juice
  • 1/2 cup sugar
  • 1/2 cup water
Wash the cranberries being careful to discard any that have become mushy or whose skin has broken.

Wash, core and slice your apples into chunks

Add sugar, water, and fruit to a saucepan.

Cook over medium low heat until all cranberries have burst and apple chunks are soft.

Use a potato masher to pulverize the fruit in the sauce pan.

Place a sieve over a mixing bowl and put the cooked fruit into it. Allow the fruit to seep through as it cools for approximately 30 minutes. Use a wooden spoon to scrape the drained mixture up away from the mesh so that undrained portions can make it through. Continue until what remains in the sieve is mostly skins, stems, and other things you don't want in a sauce.

If you want a thicker sauce, return the strained fruit to a clean saucepan and reduce over low heat until it reaches your desired thickness.

Once the strained fruit mixture is cool, stir in the citrus juices. Never add the citrus juices while the mixture is too hot, as it will destroy the vitamin C in the juice and leave a bitter taste.


Sunday, December 13, 2020

Solstice Salad

This recipe started out many years ago as an upscale version of a Waldorf Salad, but I have made enough modifications over the years of the Winter Solstice Banquet, that it deserves its own name. I know that many of you might have been served something that was called a Waldorf Salad, but believe me, if you hated it, it was not this salad.

Give this wintry creation a try!

Serves 2 or 3

Solstice Salad

  • 1 Honeycrisp apple
  • Juice of 1/4 lemon
  • 1 1/2 stalks of celery
  • 3 spears of red pepper
  • 1 scallion
  • 3 heaping tablespoons raw shelled pistachios 

For the dressing

  • 1/4 cup sour cream
  • 1 teaspoon mustard
  • 1 1/2 teaspoon honey
  • Salt and pepper to taste

Put it together

Preheat your oven to 200F and spread the pistachios on a baking sheet. Lightly toast for about 20 minutes. Chop finely in a food processor or mill and set aside

Peel, core and quarter the apple. Cut into pieces about a 1/4 inch. Toss with the lemon juice.

Cut the celery and red pepper into pieces smaller than the apple pieces and add to the mix.

Chop the scallion into really small pieces and add them in as well.

Whisk together the sour cream, mustard and honey. Add salt and ground pepper to taste.

Toss the salad and dressing together. Plate using a slotted spoon, allowing excess dressing to fall away.

Dust the salad generously with the toasted ground pistachios.

Chill the plated salads in the refrigerator before serving.

apple, celery, red pepper, scallion, and knife on cutting board
I know there are only two red pepper spears here. I had to adjust!

Pistachios ready for toasting

Dressing whisked

Chopped and tossed

Such a great aroma!

Let the Winter Solstice Banquet begin!


Tuesday, November 17, 2020

Sukiyaki: an evolutionary update

Since about the second month of the pandemic I’ve been delving deeper and deeper into Japanese cuisine. Mostly that has been learning new recipes from JustOneCookbook.com but in addition to that, I have been learning more about my favourite dish, sukiyaki. I wrote a piece about my connection to that dish and more broadly to Japanese culture here: Gagne Family Sukiyaki: This is going to be complicated

So, why am I writing about this again? I want to show how my sukiyaki making has evolved over the last few months as I have learned more about the tradition. I will rush to note that nothing I learned about making this dish as a child was wrong and the results are the same level of deliciousness. The two main differences are 1) using more traditional Japanese ingredients and fewer substitutes and 2) using a traditional iron cooking pot. My mother didn’t have easy access to a specialty Asian / Japanese grocer as I do now, so I don’t blame her one bit. Also, my Dad would have never eaten tofu.

Here is where you can get yourself a tetsu nabe - a cast iron cooking pot. I have a 28 ounce one, which feeds me when I’m starving. If you were including other dishes, then that size would likely feed two.


Sauce

  • 1 cup soy sauce
  • 1 cup sake
  • 1 cup aji-mirin
  • 1/4 cup sugar
  • 1/4 cup awase dashi
I make this sauce in double batches and keep it on hand. It’s never going to go bad, and I make this dish a couple times per month in the fall and winter, so it gets used up quickly.

You can buy instant dashi powder, but I prefer to make my own following the instructions by Nami Chen on JustOneCookbook.com How to make dashi


Ingredients

  • 1 tablespoon neutral flavour oil
  • 1 finely chopped shallot
  • 1/2 pound beef cut for sukiyaki
  • 3 scant pinches aji-no-moto (don’t believe the anti-Asian propaganda about MSG)
  • 2 green onions
  • 2 napa cabbage leaves
  • 1/2 cup shirataki noodles (nearly 0 net carbs!)
  • Shimeji and / or enoki mushrooms
  • 2 stalks of celery
  • braised tofu
  • bean sprouts
Prepare your sauce and ingredients in advance. Use a culinary torch to braise the tofu.

Heat the oil in the iron pot and being to sauté the shallot. After a few minutes, add the beef to brown it. Sprinkle with aji-no-moto. When all the pink is gone, remove the pot from heat.

Pile the beef up in the center and arrange the other ingredients around it, leaving the bean sprouts out for now.

Add sauce until is it about a half inch from the lip of the pot. Return to heat and bring to a rolling bubble. Place the cedar lid on the pot and reduce heat to low. Simmer covered for 8 minutes.

Add the bean sprouts to the top and cover for an additional 2 minutes.

Serve immediately.with a spoon and chopsticks.

Photos


chopped shallot and thinly sliced beef
There is no substitute for the beef. You just have to find an asian grocer who prepares it.

small cast iron cooking pot labeled “tetsu nabe”

shallot sautéing in iron pot

beef in pot

remaining ingredients except bean sprouts in pot

Reusable container half full of sukiyaki sauce

iron pot with cedar lid on next to ingredient gray with bean sprouts and cooking chopsticks

Pot content after eight minutes cooking time.

bean sprouts laid on top

iron pot at place setting with spoon, napkin, and chopsticks


Cooking with Flame

I have grown attached to cooking with a flame, so I bought a Japanese butane burner unit like the ones used in every hotpot restaurant in the world. The accompanying instructions tell you to never use it indoors, but that is really just for insurance purposes. What you have to do is not use it in an enclosed space like a tent or camper and also not use it for extended periods of time. Butane burns much cleaner than propane, so as long as you have significant ventilation, you’re fine. The risk is that if you are in an enclosed space and the oxygen supply starts to get used up, then the butane flame will stop producing carbon dioxide, which you can handle, and start producing carbon monoxide which will kill you in minutes. I keep mine on top of my electric range with the hood vent running and do not have any concerns. Here is the model I have. It has the best safety rating.


Tuesday, September 22, 2020

Why It Took So Long

The love of my life is Doug Barr. He was born and raised in Victoria, British Columbia, and I in the Seattle area. We met on 7 April 2001 at the Scottish Cultural Centre in Vancouver BC, where a very famous Scottish Gaelic singer, Cathy-Ann MacPhee, was performing. We had our first date in Seattle the next weekend and on it went.

two mid thirties men in a mountain gondola
October 2001, Whistler. See the bunny ears?

One thing that you have to know about Doug is that the literal meanings of words are very important to him. We have never been ‘boyfriends’ because we are definitely not boys anymore. I adopted the alternative title for myself of Potential Pre-Husband.


When I met Doug, he was working for the Royal Bank of Canada. He held several positions there, and the last was the worst. It involved early morning shifts on the weekends, which were the only times we had together. One particular Sunday morning - and I mean morning - I helped with us getting up an dressed and drove him to work. We both smoked at the time, (we’ve quit - SHUSH!) and so were having a cigarette in the parking lot before he went inside.


He put his hand on my shoulder and said softly “Thank you for getting me here this morning.”


I said “That’s what Potential Pre-Husbands are for!”


“That’s a really long title.” he said.


“You’re the one who doesn’t like ‘boyfriend’.” I quipped.


“I think of you as my fiancé.” he said.


“I WILL!” I answered.


And we were theoretically engaged. We didn’t speak of it again for years. After all, legal marriage wasn’t available to us and neither of us have any interest in empty gestures.


Then, on July 20th, 2005, Canada legalised same-sex marriage nation-wide. Our close friends Geoff and Joe who are American decided to have a wedding ceremony in Vancouver, though it wouldn’t have any force back in the States. They arranged a lovely ceremony on the upper deck of a harbour cruise boat, and afterward, we headed out into English Bay to enjoy the annual fireworks competition overhead and pretend it was for our friends.


Enjoying the views and each other we strolled the decks. The muzak was light jazz, which neither of us like and Doug turned to me and said “Tell me at our reception we’re not going to have...” I didn’t let him finish “No. No light jazz.” And that was the second time we talked about our wedding.


In the intervening ten years before the United States got around to recognizing our fundamental right to marry, many things happened. Doug decided to give post-secondary education a try for the first time. As someone with ADHD which remained undiagnosed until his mid-30s, it had never seemed a realistic goal before. I released my first solo CD which is a mountain of hard work.


Then, in 2013, I was diagnosed with Type II diabetes. Doug got me through the initial shock, lifestyle changes, and self-education. When things were calm again, on a certain Sunday before I drove home to Seattle, we had dinner out and I broached the subject.


“Honey, I’m OK, we’re OK, and we’ve got this now. But, if true disaster befell me, you wouldn’t be able to take me in because of that border. In the eyes of the law, we’re just friends.” I said.


“We should start fighting about the guest list.” he answered and went back to enjoying his hot pot. It was getting cold, and the man is nothing if not practical.


I was one of the founding Board members of Slighe nan Gaidheal, Washington’s Scottish Gaelic Language and Cultural Society and had served continuously since its beginning in 1997. Our terms were three years long, and so when I was up for reelection in 2012, I had announced that it would be the last term I sought. I had all these things I wanted to do in my life that weren’t making any progress and part of the reason was the 10+ hours of volunteer work for the society every week.


Right on cue, I retired from the Board of Slighe nan Gaidheal and marriage became legal for us in the United States in 2015. I supposed that’s really where the journey to our handfasting, and on to our wedding began.


Forming a cross-border family is trickier than you might imagine. Deciding where each part of the process will happen is fraught with politics. It’s even more complicated when the marrying parties are of different religions, with one of them having been raised by evangelical atheists.


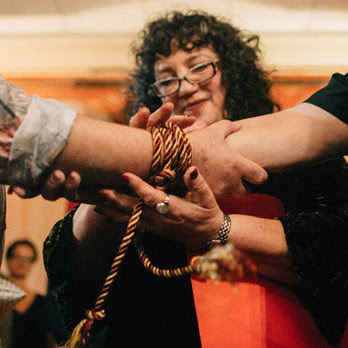
Rev. Judith Laxer ties the knot

But we managed it in the end. We were handfasted (formal betrothal in my religion) in Seattle on 2 October 2019, and cast the spell together which said “let all things be put in motion so we are ready to marry on 3 October 2020.”


Of course, we naively thought it would happen as planned at the Scottish Cultural Centre in Vancouver BC where we first met. But no.


The “all things put in motion” apparently included providing extensive material assistance to a parent transitioning into care, an extremely dramatic real estate deal to close my mother’s estate after 20 damn years, a global pandemic, a closed border, and re-planning the wedding four times as rules changed.

I guess the moral of this story is that people in love can endure incredible trials to finally make to their Happily Ever After day. (we know, it won’t all be happy - SHUSH!) Believe in Love, and in each other, and anything is possible.

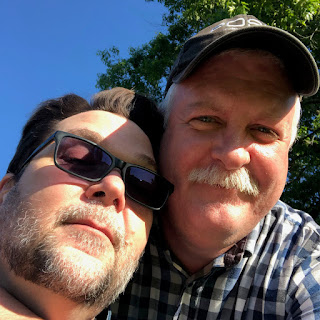
June 1, 2020 Peace Arch Park